Configuration
nvidia-smi+-----------------------------------------------------------------------------------------+ | NVIDIA-SMI 560.94 Driver Version: 560.94 CUDA Version: 12.6 | |-----------------------------------------+------------------------+----------------------+
Pytorch installation within DLC environment
pip3 install --pre torch torchvision torchaudio --index-url https://download.pytorch.org/whl/nightly/cu126Tutorial
In this tutorial, we will learn the basic steps of using DeepLabCutꜛ for tracking animal behavior. DeepLabCut is a popular open-source software package for markerless pose estimation, which allows you to track the movement of animals or other objects in videos. DeepLabCut uses deep learning algorithms to automatically detect and track body parts in videos, making it a powerful tool for studying animal behavior.
 DeepLabCut logo. Source: deeplabcut.github.ioꜛ
In this hands-on session, we will go through the typical workflow of a DeepLabCut project and learn how to
- install DeepLabCut,
- create a project,
- extract frames for labeling,
- label movies,
- create a training dataset,
- train the network,
- evaluate the network,
- analyze movies, and
- evaluate the results.
We will focus on using the DeepLabCut graphical user interface (GUI) for these tasks. However, DeepLabCut can also be used in a command-line interface (CLI) or in a Python script, which offers more advanced options and flexibility.
Installation of DeepLabCut
We recommend to follow the installation instructions on the DeepLabCut websiteꜛ, as they are regularly updated. In the following, we provide a brief overview of the installation process:
- Install Python via Anaconda or Miniconda.
- It is recommended to run DeepLabCut on a GPU. If you have a
- NVIDIA GPU, install the according NVIDIA drivers, the CUDA Toolkit and cuDNNꜛ. To check your GPU is working, in the terminal, run:
nvidia-smi - Apple Silicon chip, make sure to install miniconda and the GPU will be used by default.
- no GPU, you can still run DeepLabCut on your CPU. Proceed with the next step.
- Create a virtual environment for DeepLabCut by using the yaml file provided by the DeepLabCut teamꜛ (either choose the according yaml file for PC (both Windows and Linux) or macOS). Once you’ve save the yaml file, create the environment by running the following command in your terminal:
conda env create -f DEEPLABCUT.yamlInfo: As of June 2024, the PyTorch Engine backend will be the default backend for DeepLabCut, and the TensorFlow backend will be depreciating by the end of 2024. Currently, if you want to use TensorFlow, you need to run pip install deeplabcut[tf] (or adjust the yaml file accordingly) in order to install the correct version of TensorFlow in your conda env.
Starting the DeepLabCut GUI
To start DeepLabCut with the graphical user interface (GUI), activate the conda environment and run the command deeplabcut in your terminal:
conda activate DEEPLABCUT
python -m deeplabcut
Alternatively, you can start start the DeepLabCut GUI from within a Python script or an active IPython session via:
import deeplabcut
deeplabcut.launch_dlc()
Typical DeepLabCut workflow
Now, we will go through a typical DeepLabCut workflow, showing step-by-step how to get from raw video data to analyzed tracking data.
Test data set
A set of test data is provided during this tutorial. However, we can’t share these data publicly. As an alternative, you can use the DeepLabCut example movieꜛ, the example movies provided by Facemapꜛ, or use your own video data. You can even record some test videos with your smartphone or webcam.
Create a new project and adjust the configuration file
Once you have started the DeepLabCut GUI, DeepLabCut’s starting screen should appear:
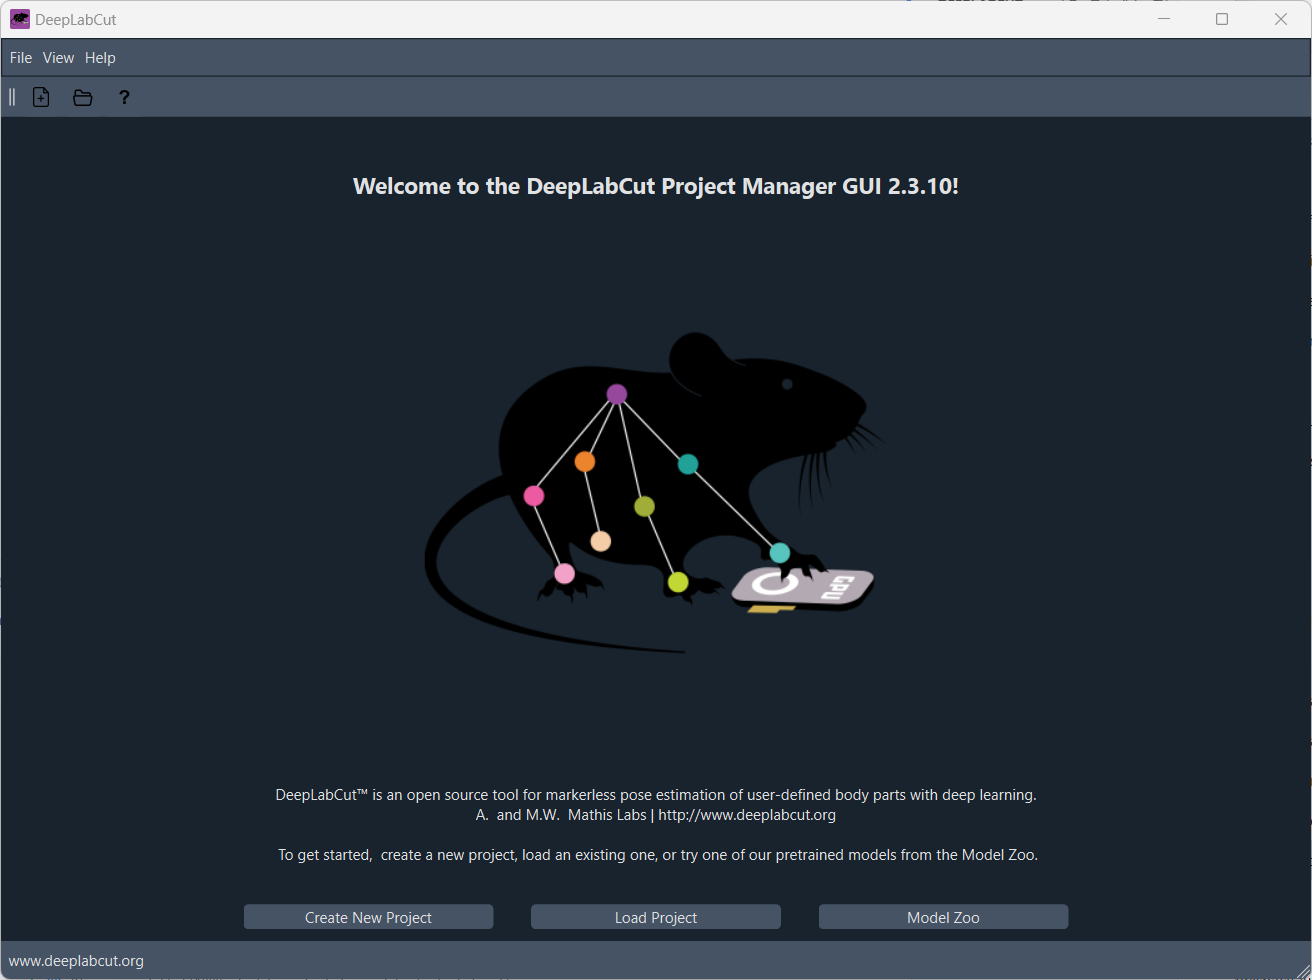
Here, you can load an existing project or create a new project by clicking on the “Create a new project” button. You will be asked to provide a project name, the experimenter’s name, and a directory where the project will be saved:
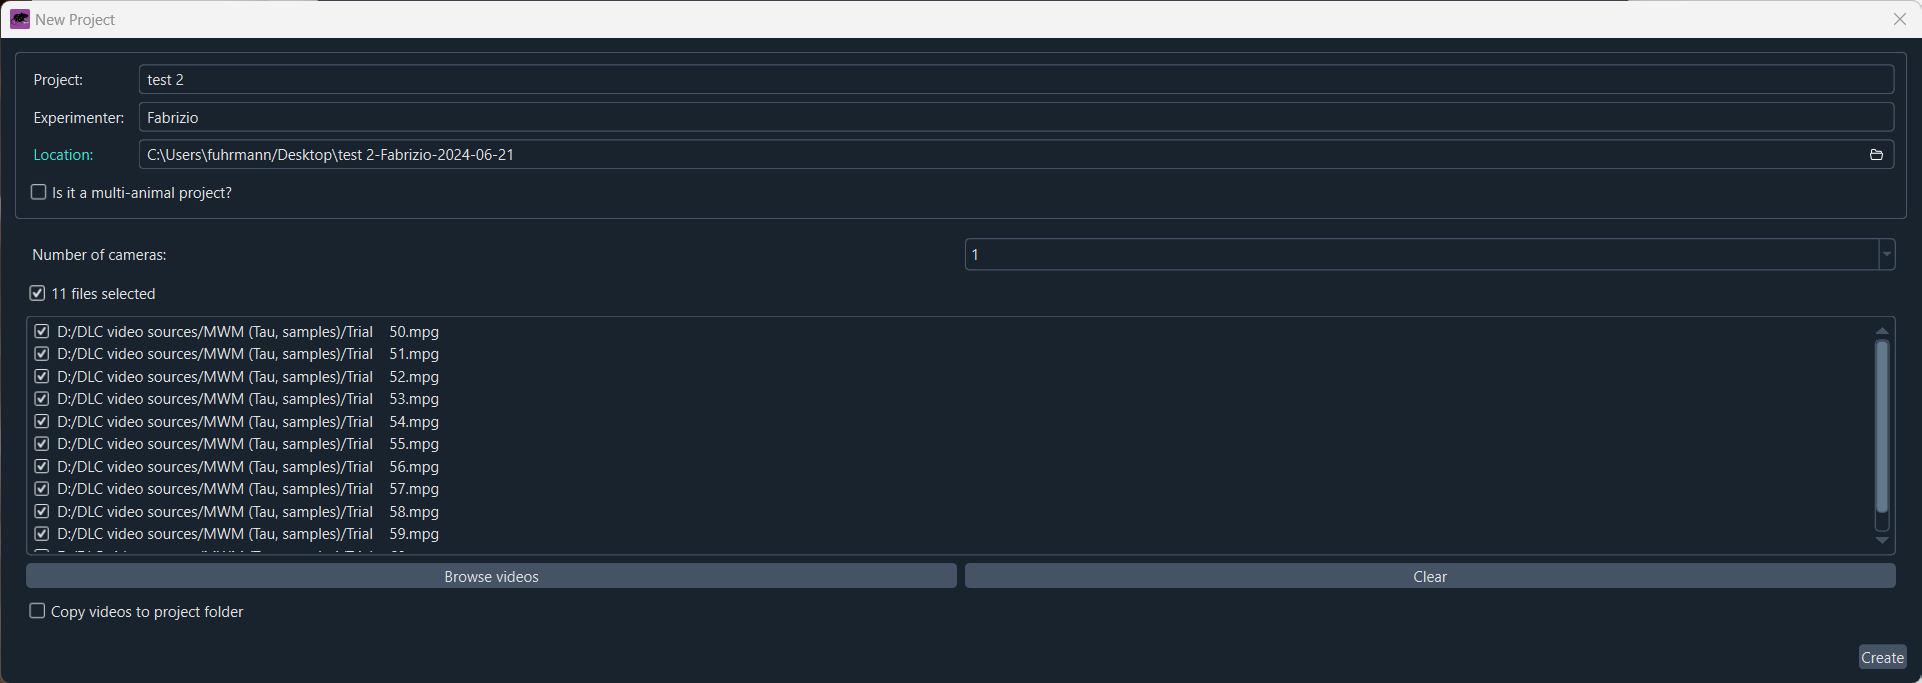
Create a new project and provide a project name, the experimenter’s name, and a directory where the project will be saved.
You can already add your video files by dragging and dropping them into file list. You can optionally choose to copy the movies into the project directory. Further options you can adjust are number of cameras and whether the project is a multi-animal experiment or not.
Video file format: DeepLabCut supports three common video file formats, avi, mp4 and mov. In case your video file format is not supported, you can convert it to a supported format using a video converter like Handbrakeꜛ.
After you have created the project, the main window of the DeepLabCut GUI will open, which is divided into several tabs. The order of the tabs from left to right actually reflects the typical workflow of a DeepLabCut project. The first tab is the “Manage project” tab, where you can adjust the configuration file of your project:
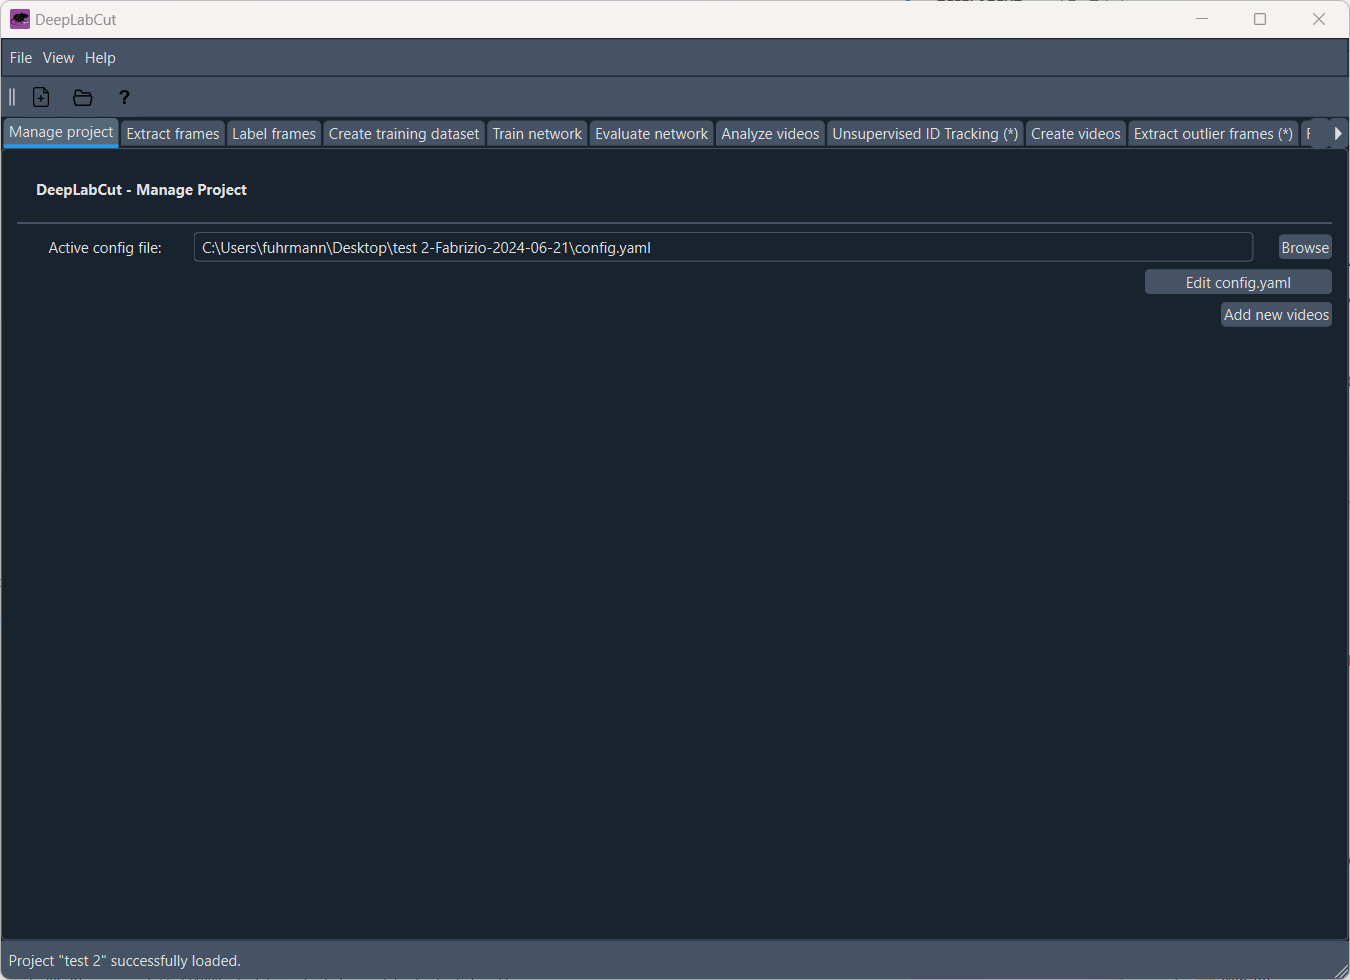
The ‘Manage project’ tab of the DeepLabCut GUI.
Here, you have the option to add more videos to your project and adjust the configuration file. The configuration file is a YAML file that contains all the settings for your project, such as the project’s name, the experimenter, the body parts you want to track, and other relevant settings. The configuration file is saved in the project directory and is named config.yaml by default. You can adjust these settings according to your needs, either by opening the configuration file in a text editor or by using the GUI (simply click on ‘Edit config.yaml’):

Editing the configuration file of your project.
For each new project, you need to define which and how many body parts you’d like to track. Body parts need to be defined under “bodyparts” in the configuration file. In the configuration file, add or remove body parts as needed and provide appropriate labels for each body part. You can also add object markers, which are used to track objects in the video that are not part of the animal’s body. In the ‘skeleton’ section, you can optionally define the connections between the body or object parts.
To train DeepLabCut’s network, we first need to label the body parts in the video frames. To do this, we need to extract frames from the video. In the “Extract frames” tab, you can adjust the settings for frame extraction, such as the extraction method and algorithm as well as a frame cropping:
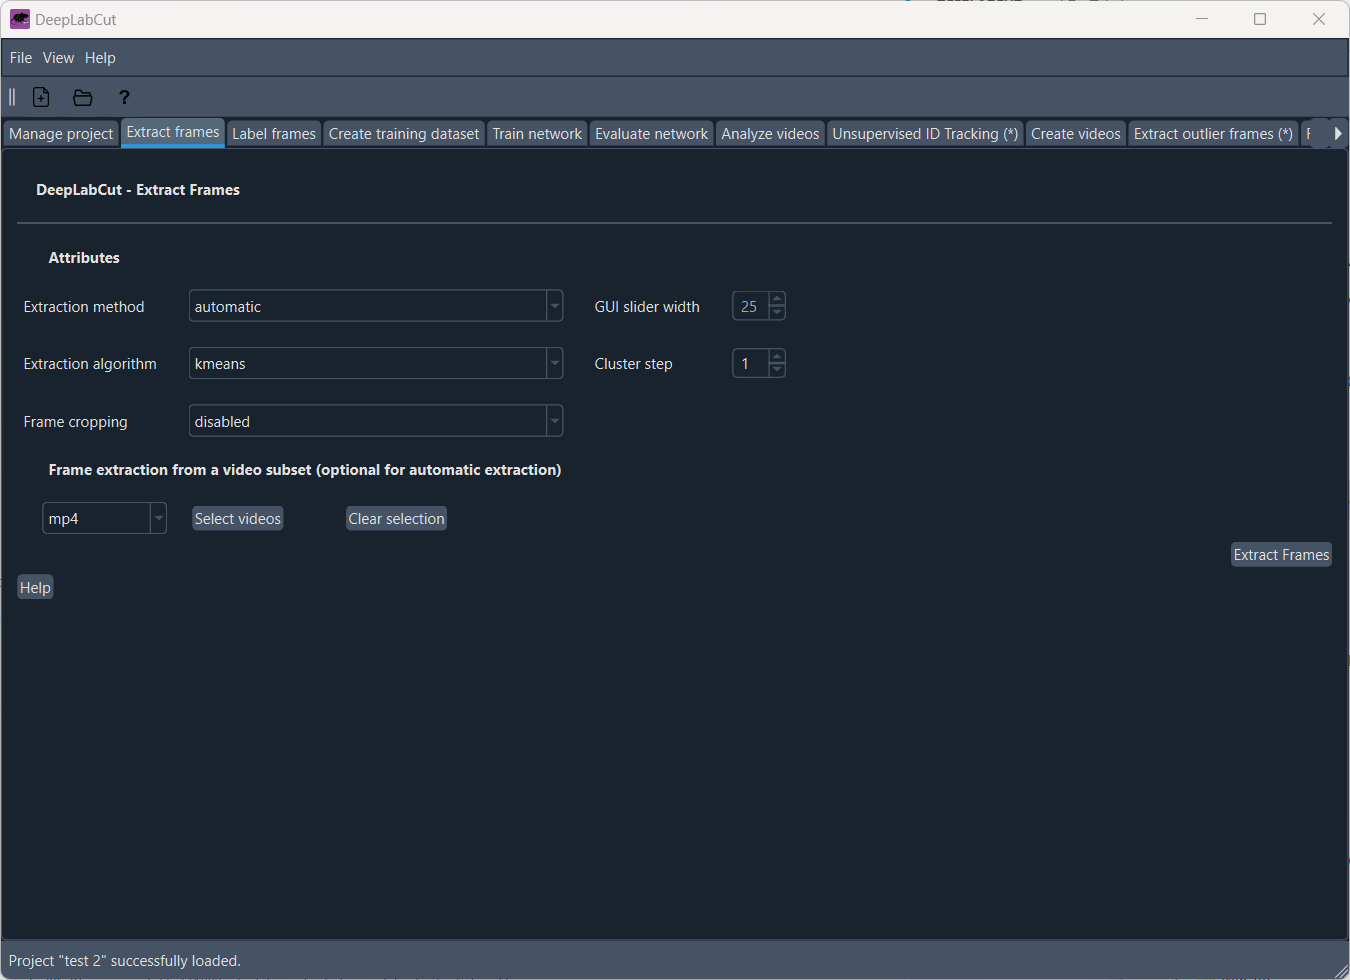
Extracting frames for labeling.
Setting the frame extraction method to “automatic” will DeepLabCut decide which frames to extract based on the video content. You can also choose to extract frames manually by setting the method to “manual”. In this case, by clicking on “Extract frames”, Napari will open, and you can manually select the frames you want to extract:
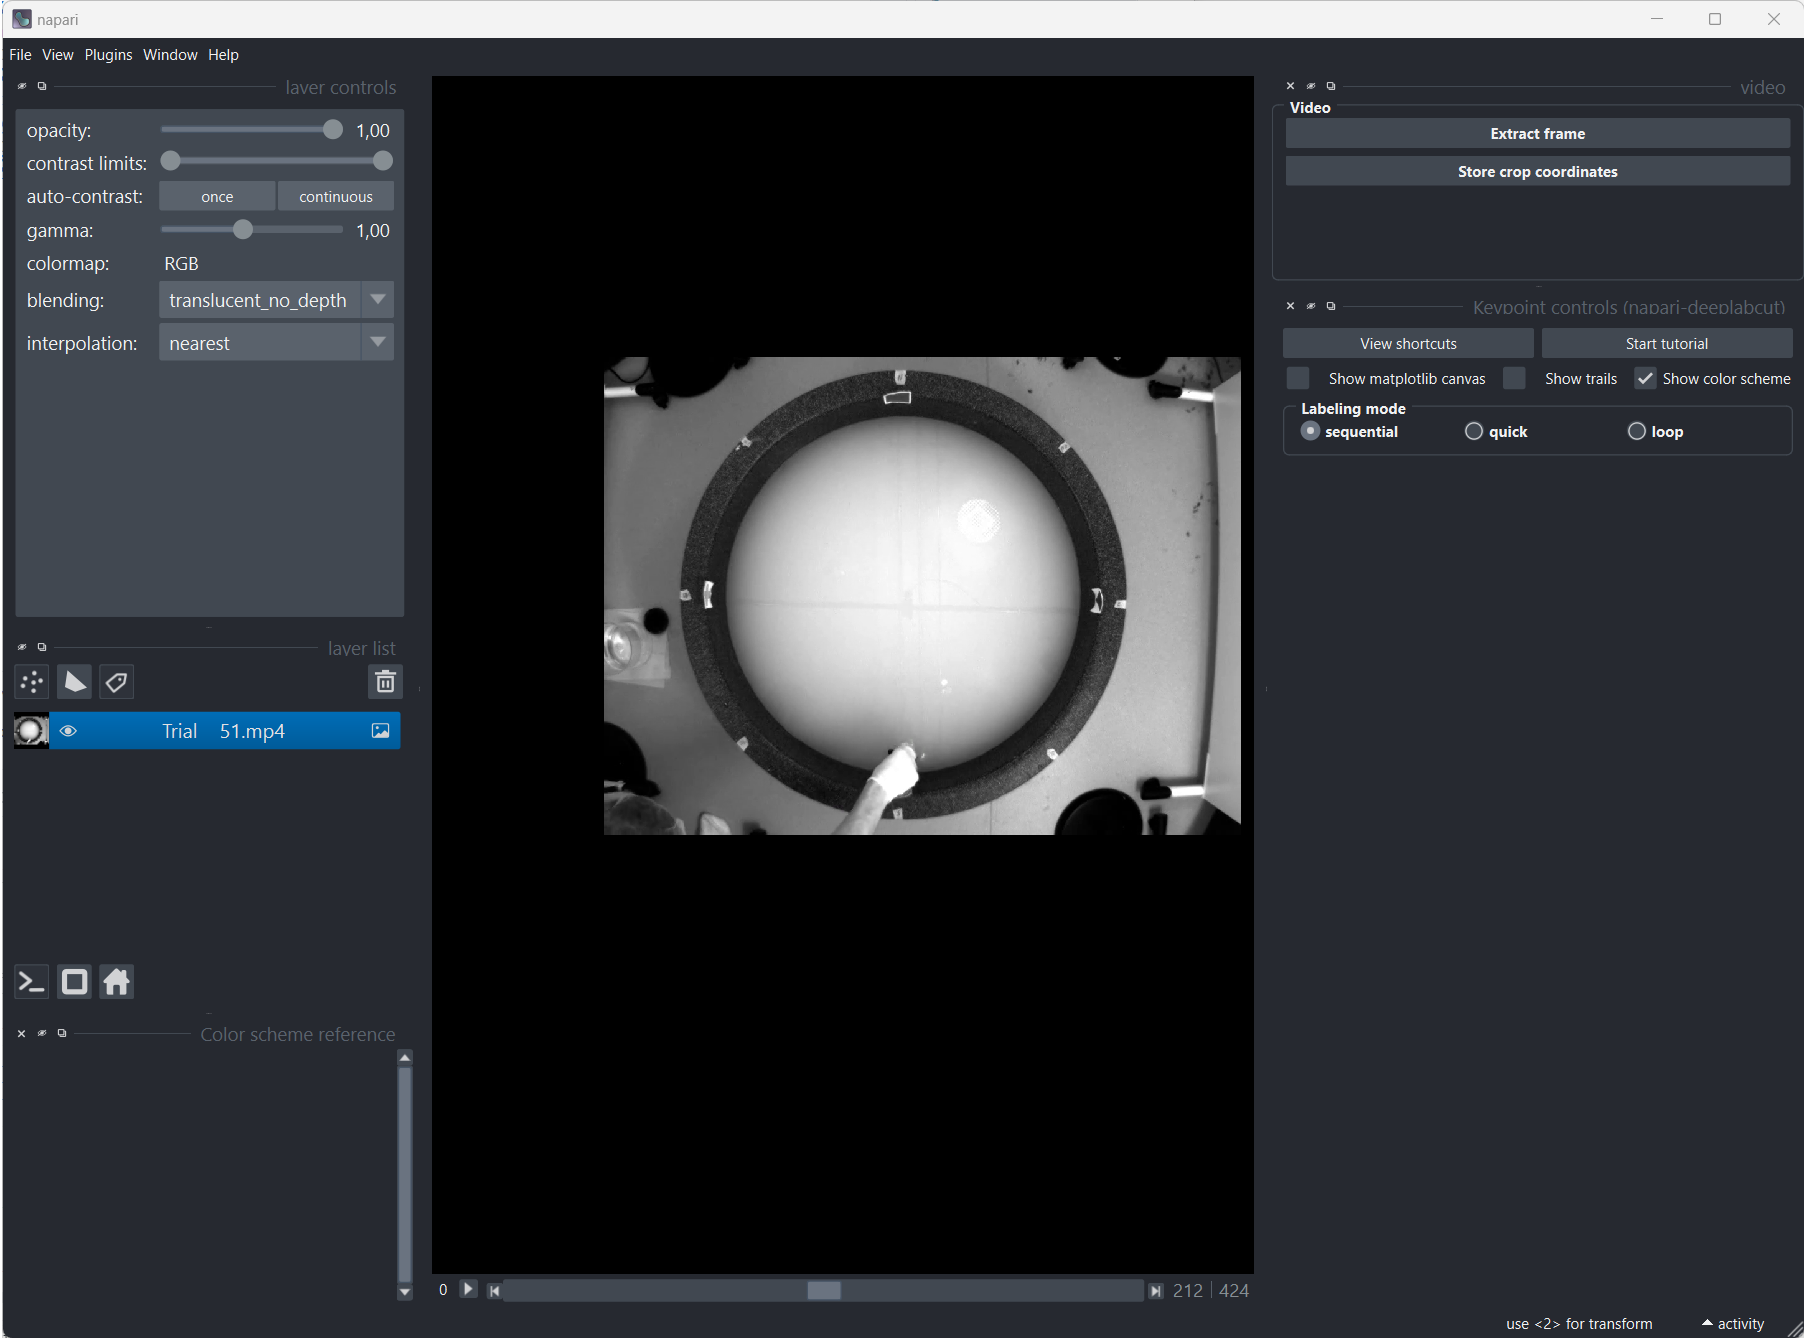
Manually extracting frames with Napari. When Napari opens, a quick tutorial will guide you through the extraction process.
It is recommended to extract enough frames from different parts of the video to ensure that the network is trained on a diverse set of images. You can also extract frames from multiple videos as well.
Label framesPermalink
Once you have extracted the frames, you can start labeling the body parts in the frames. In the “Label frames” tab, simply click on “Label frames”, and Napari will open, allowing you to label the body parts in the frames:
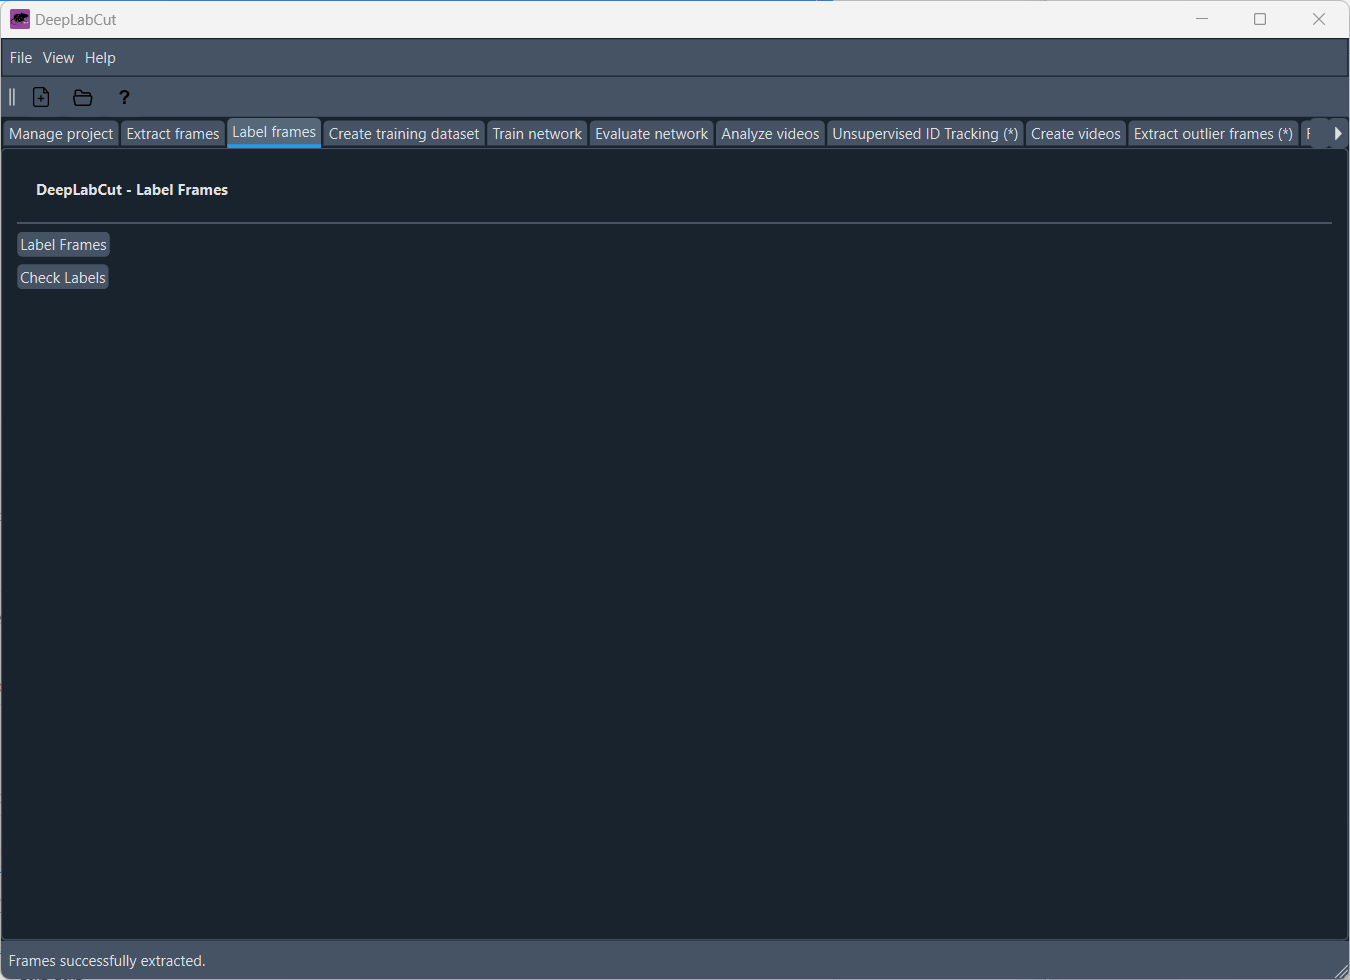
The ‘Label frames’ tab.
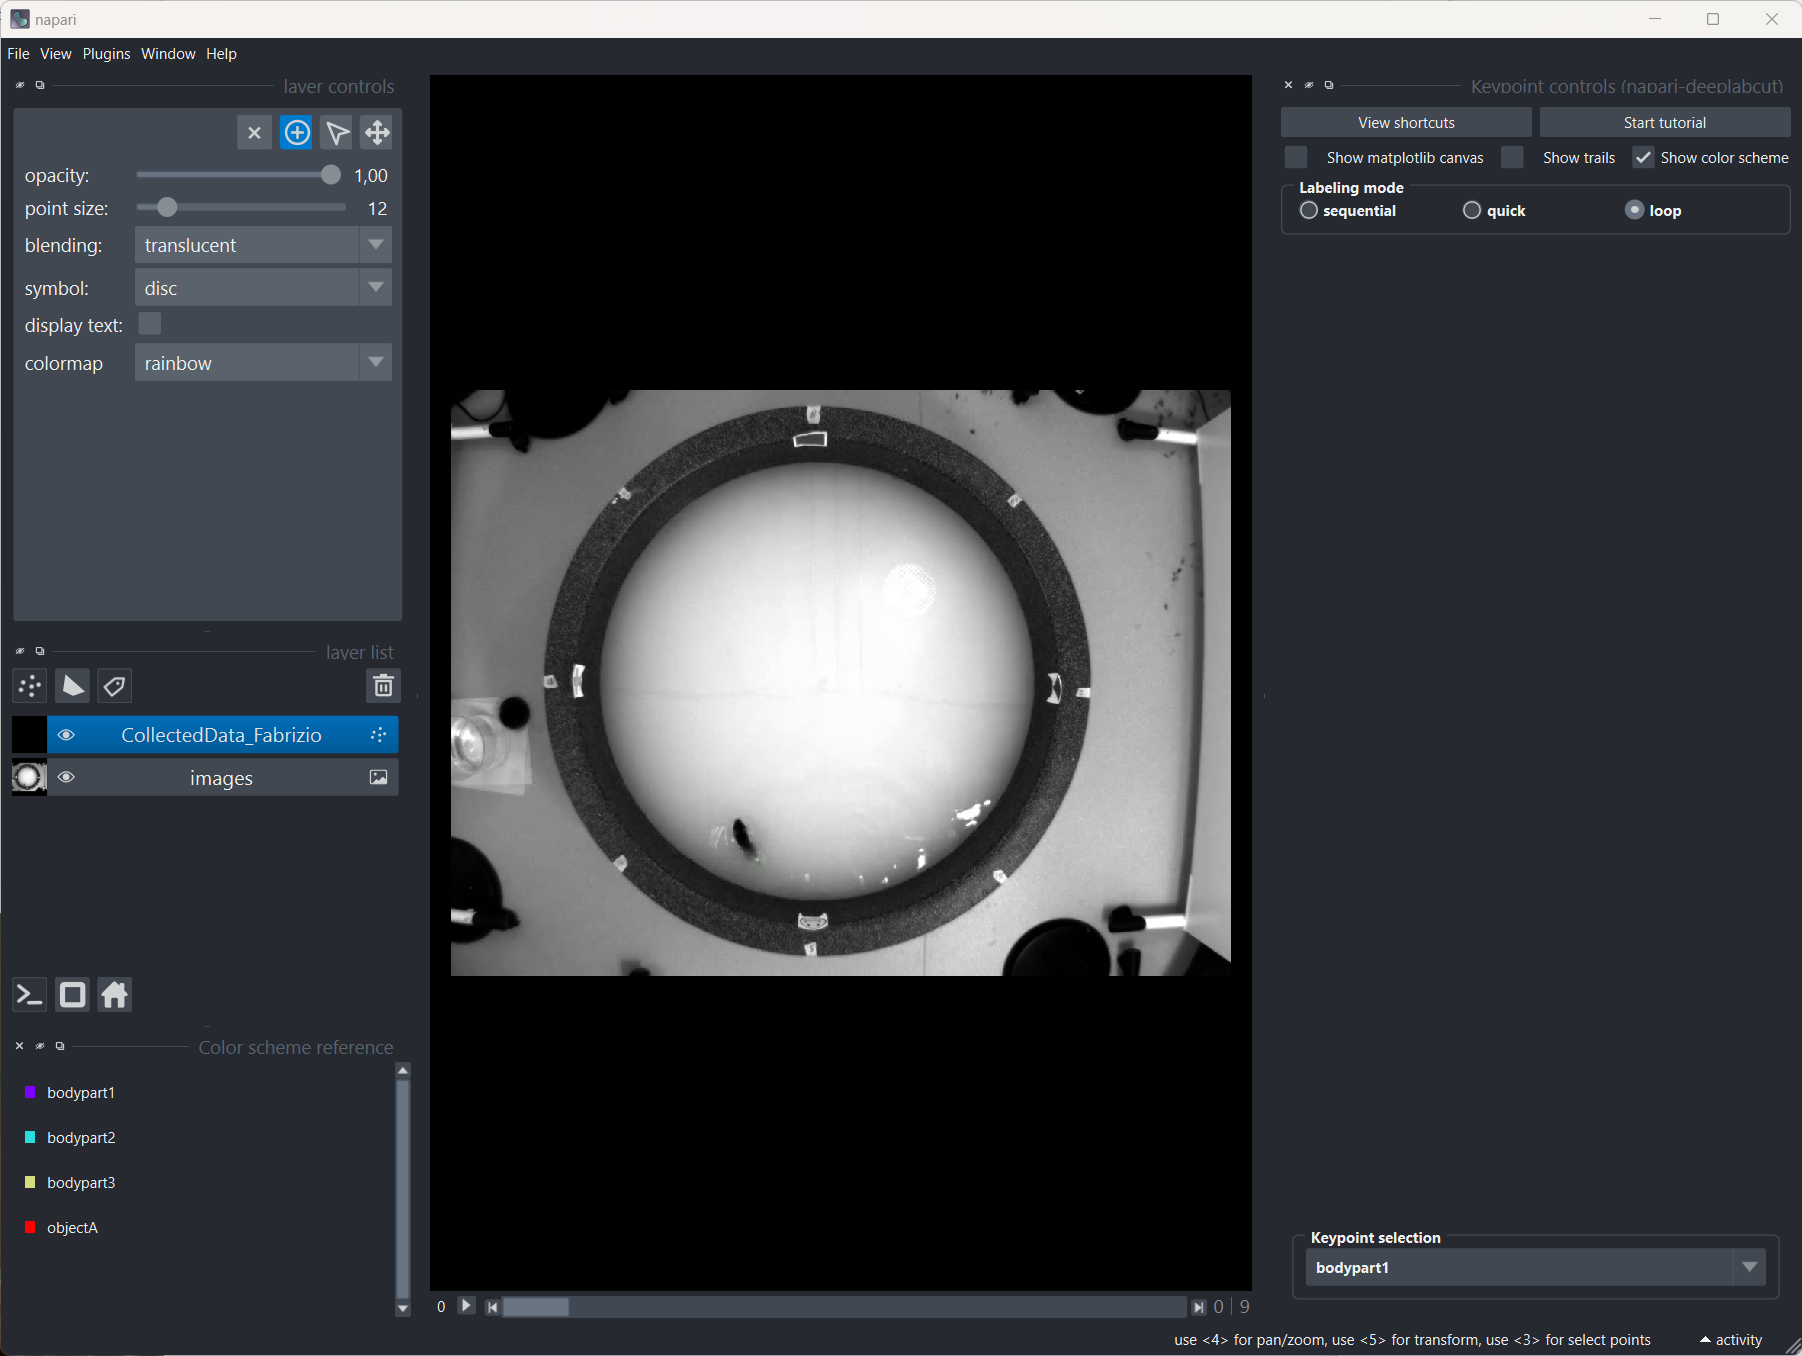
Napari to label the body parts in the frames. When Napari opens, a quick tutorial will guide you through the labeling process.
When you are done labeling the frames, simply click Ctrl/CMD + S to save the labels or choose Save Selected Layer(s) from the File menu, having the spot annotation layer selected
Create a training datasetPermalink
Next, we need to create a training dataset from the labeled frames. In the ‘Create training dataset’ tab, you can select the “Network architecture” (i.e., backbones or “neural networks”ꜛ: ResNets, HRNet, DEKR, BUTCTD, DLCRNet, or AnimalTokenPose ) and which “Augmentation method” to use. Augmentation is a technique to artificially increase the size of the training dataset by applying transformations to the images, such as rotation, scaling, and flipping. This helps to improve the generalization of the network.
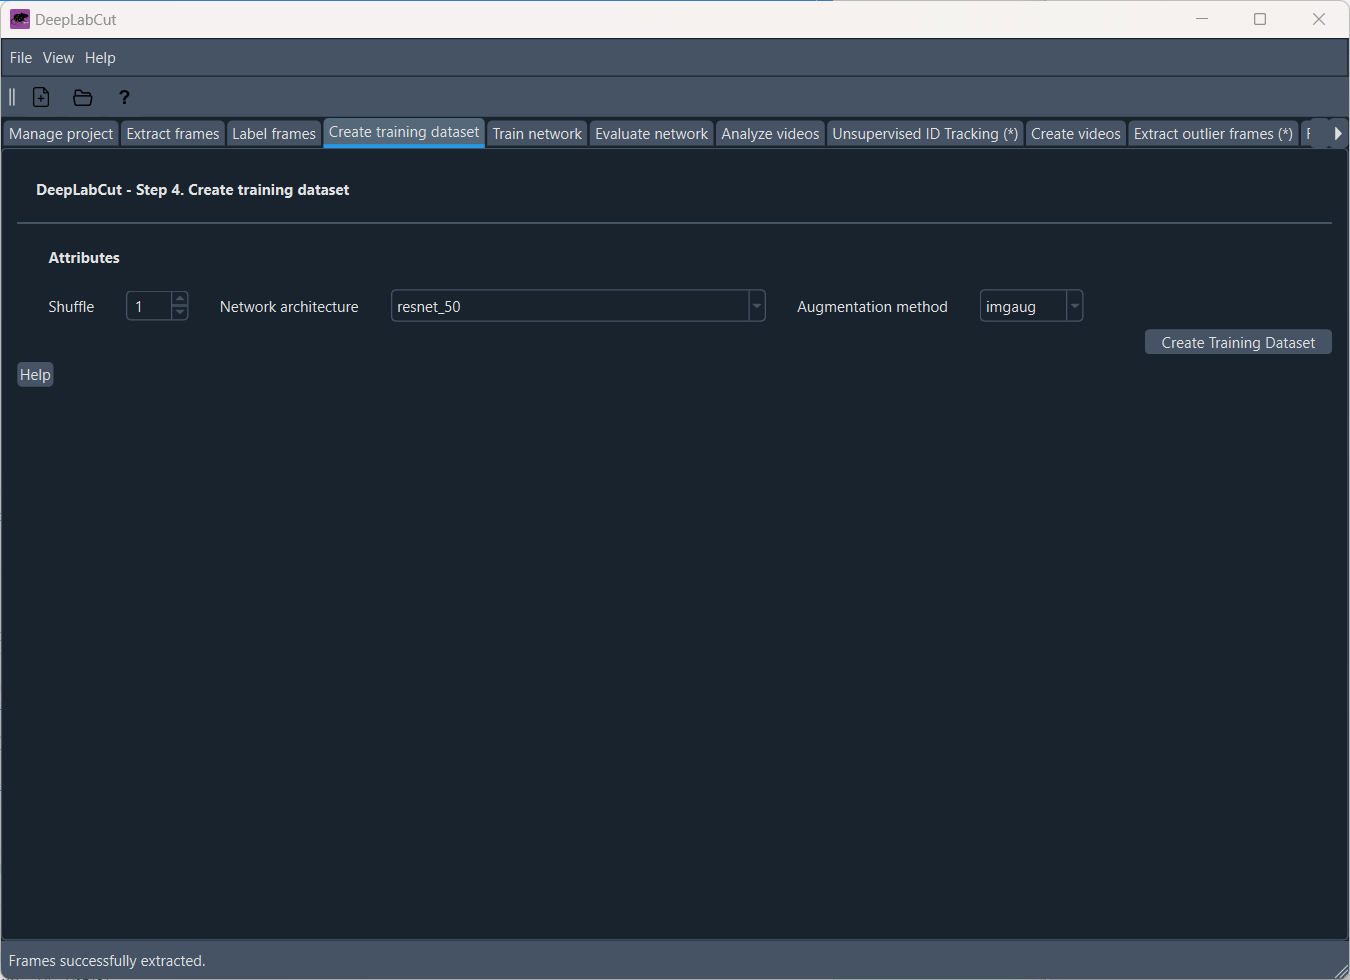
The ‘Create training dataset’ tab.
Train the networkPermalink
Now we are ready to train the network. In the “Train network” tab, you can adjust the settings for training the network:
- Shuffle: Specifying the shuffle index to select for training, controlling the randomness of the training data.
- Display iterations: specifies how often the training progress will be visually updated.
- Save iteration: at what iteration intervals snapshots of the model of the model should be saved.
- Maximum iterations: Decide how many iterations to run. For TensorFlow models for a quick demo, 10K is great. For PyTorch models, 200 epochs (iterations) is fine.
- Number of snapshots to keep: Choose how many snapshots of the model you want to keep.
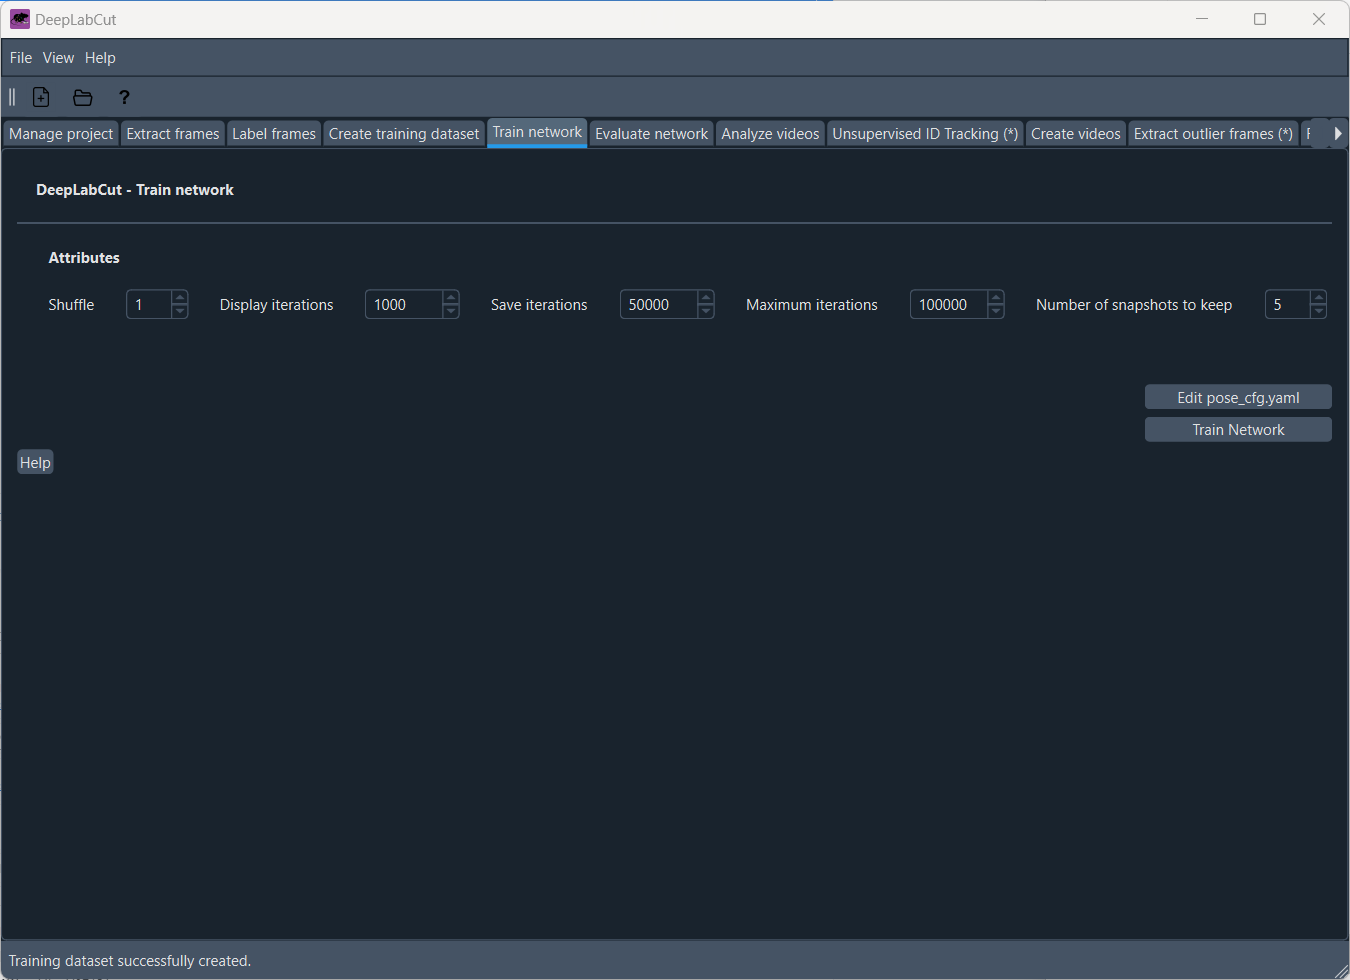
The ‘Train network’ tab.
Once you have adjusted the settings, you can start training the network by clicking on “Train Network”. The training process will take some time, depending on the size of your dataset and the complexity of the task. You can monitor the training progress in the terminal or in the GUI. As a proxy, you can monitor the training progress by looking you system monitor for the CPU and GPU usage:
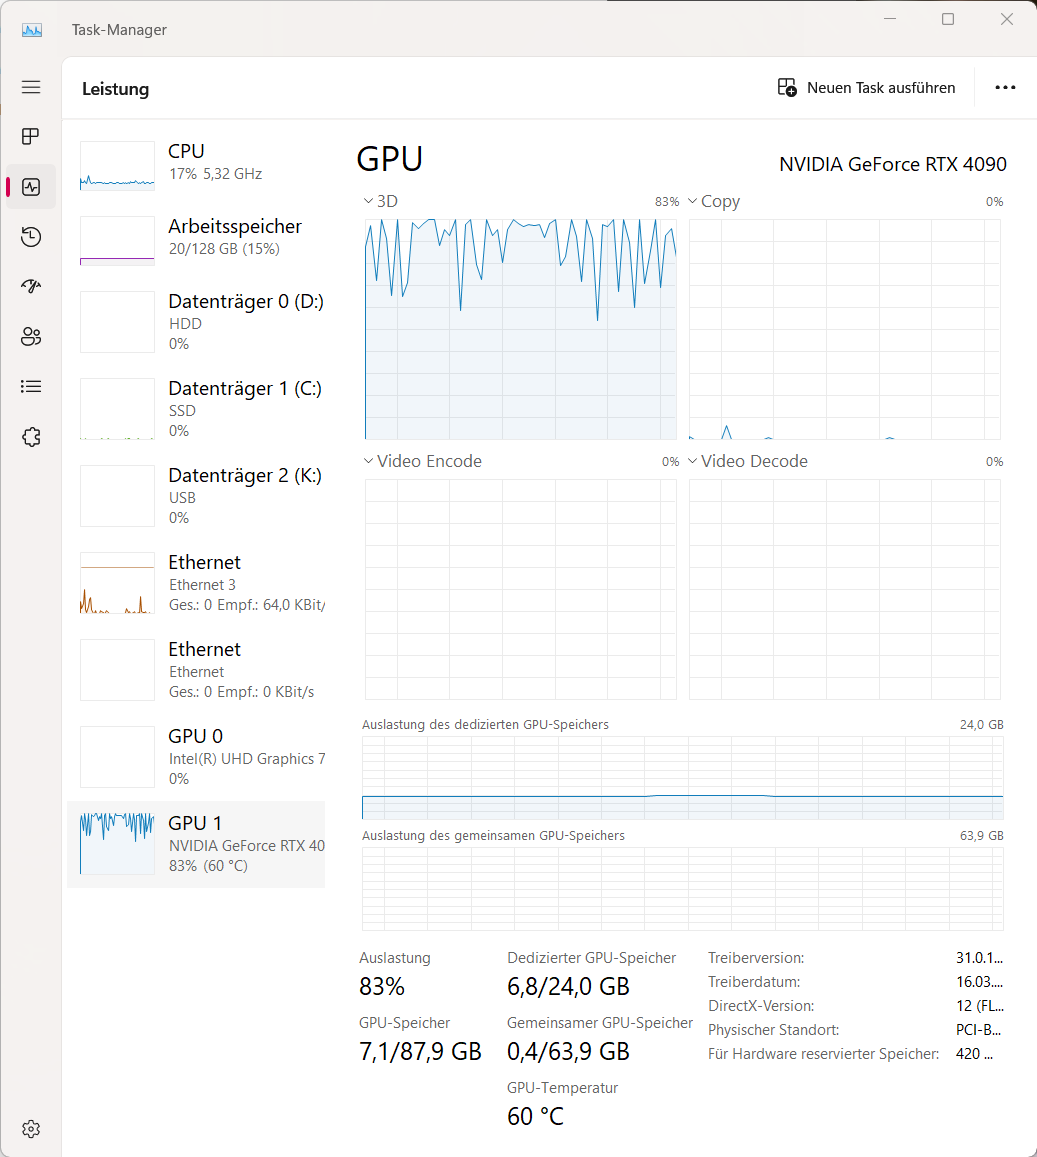
Task manager (Windows) showing the CPU and GPU usage during training. The GPU/CPU usage should be increases during training.
Alternatively, you can also monitor the progress of the training by checking the number of snapshots saved in the project’s train directory:
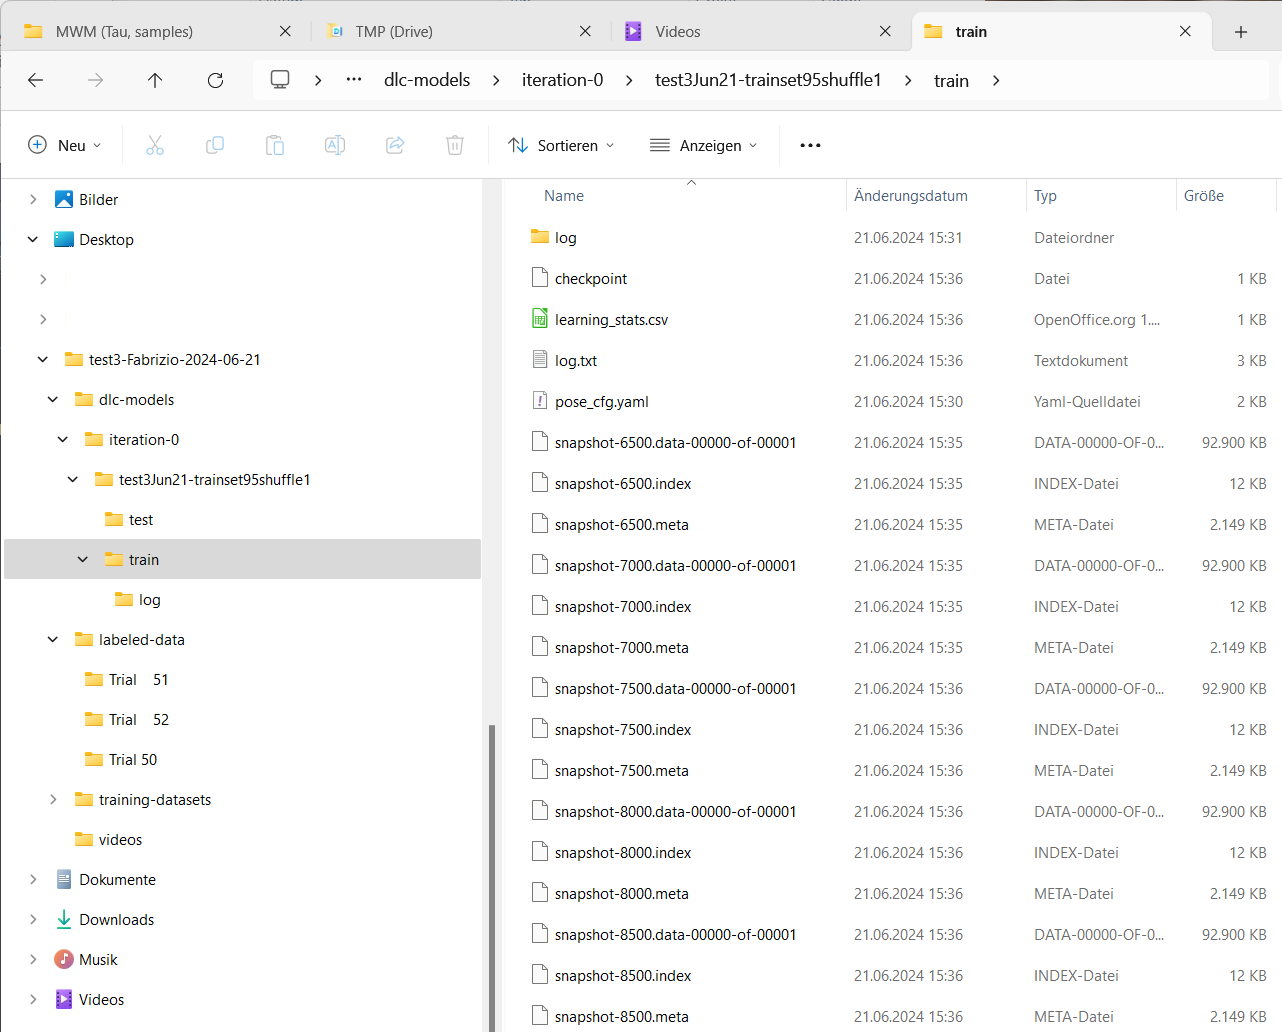
Monitor the training progress via the snapshot and log files created in the project’s train directory during the training process.
Evaluate the network
It is crucial to evaluate the performance of the trained network. In the ‘Evaluate network’ tab, you can let DeepLabCut create some test images with which you can evaluate the network’s performance:
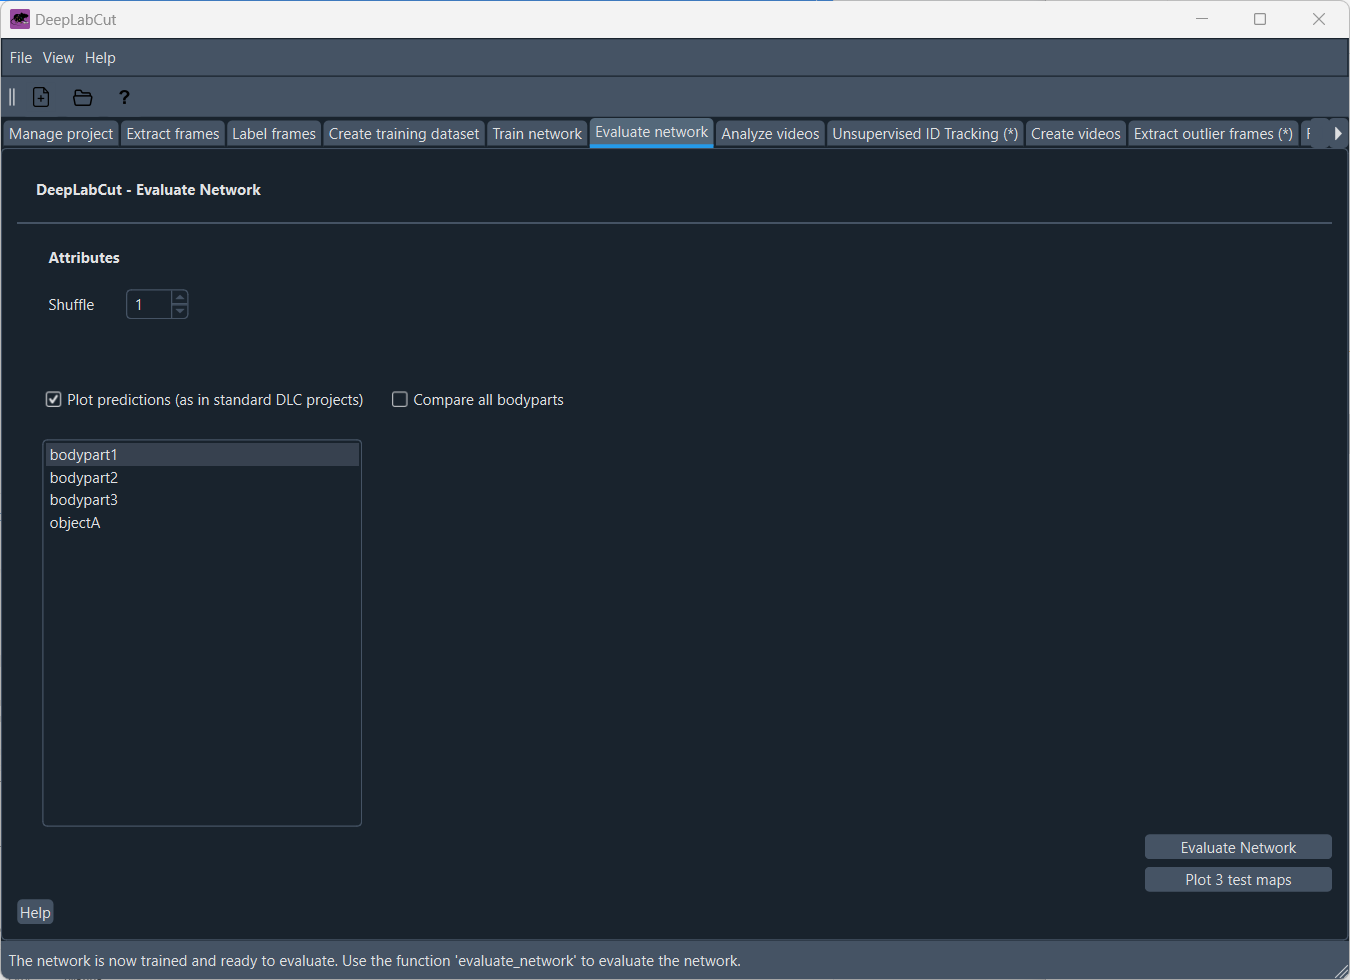
The ‘Evaluate network’ tab.
You can choose, which tracked body parts should be evaluated or to compare all body parts. The evaluation will create a set of test images with the predicted body parts overlaid on the original images. You can then visually inspect these images to see how well the network performs. Just click on “Evaluate Network” to start the evaluation process. Additionally, you can also “Plot 3 test maps” for a quick overview of the network’s performance.
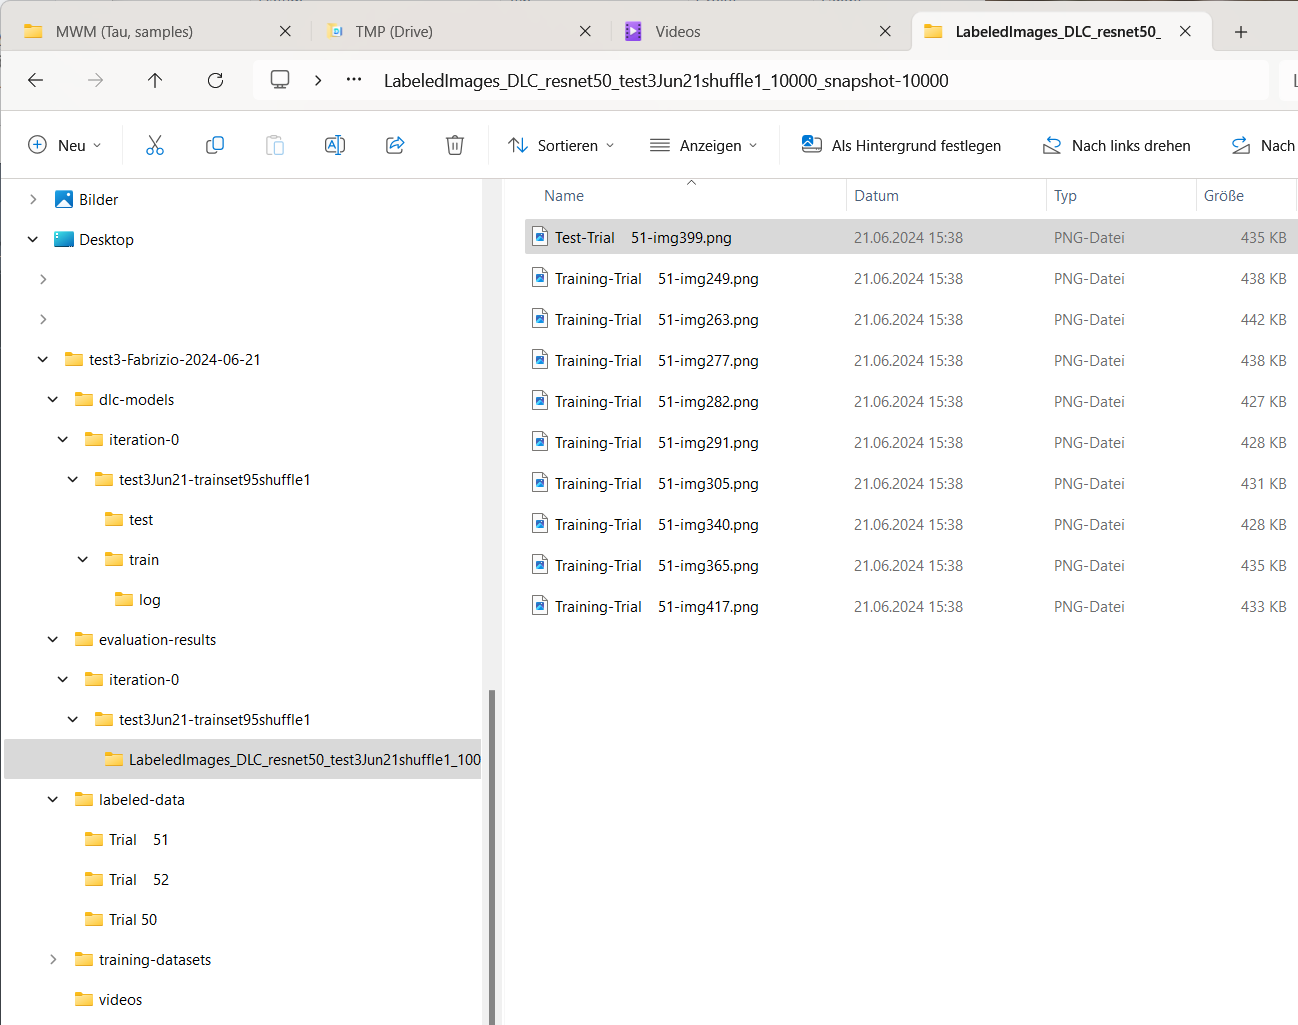
After clicking on “Evaluate Network”, DeepLabCut will create a set of test images with the predicted body parts overlaid on the original label images (ground truth). You can visually inspect these images to see how well the network performs.
Once you are satisfied with the network’s performance, you can proceed to analyze your movies.
Analyze moviesPermalink
Finally, you can analyze your movies using the trained network. In the ‘Analyze videos’ tab, you can adjust the settings for analyzing the videos, such as
- “Save result(s) as csv”: you should always enable this option in order to get the tracking data as a csv file for your post-hoc analysis
- “Filter predictions” to filter out predictions that are not reliable), and “Track the object” (to track the object in the video
- “Plot trajectories” to visualize the tracking results.
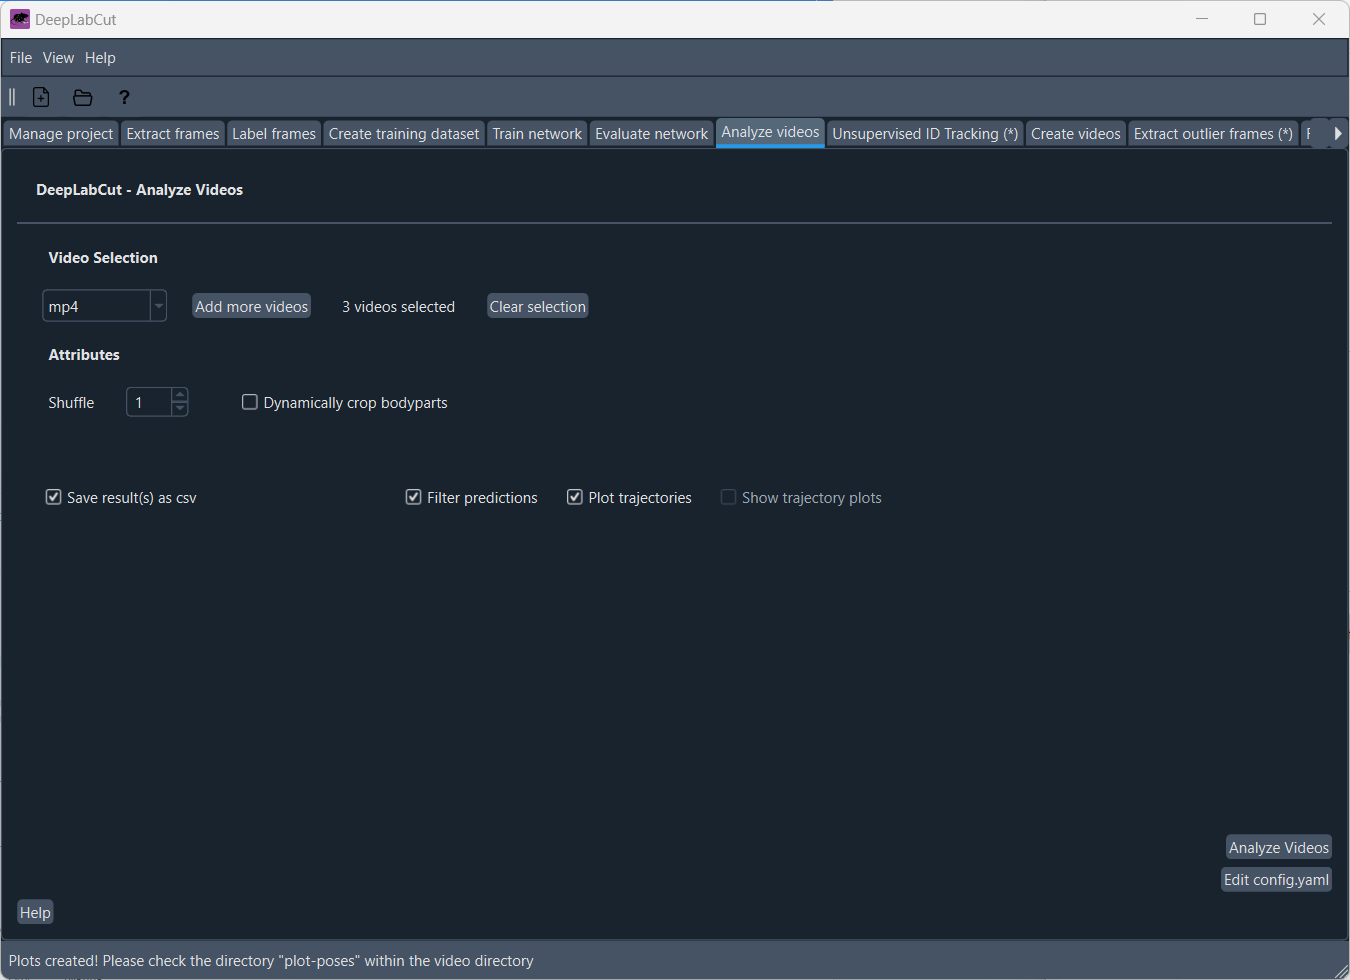
The ‘Analyze videos’ tab.
By clicking on “Analyze Videos”, DeepLabCut will analyze the videos using the trained network and save the tracking data as a csv file. You can then use this tracking data for further analysis, such as calculating the animal’s speed, acceleration, or other behavioral parameters. The analysis will take some time, depending on the length of the videos and the complexity of the task.
Evaluate the resultsPermalink
After analyzing the videos, you can evaluate your results in the ‘Create video’ tab. Here, you can create a video with the tracking data overlaid on the original video:
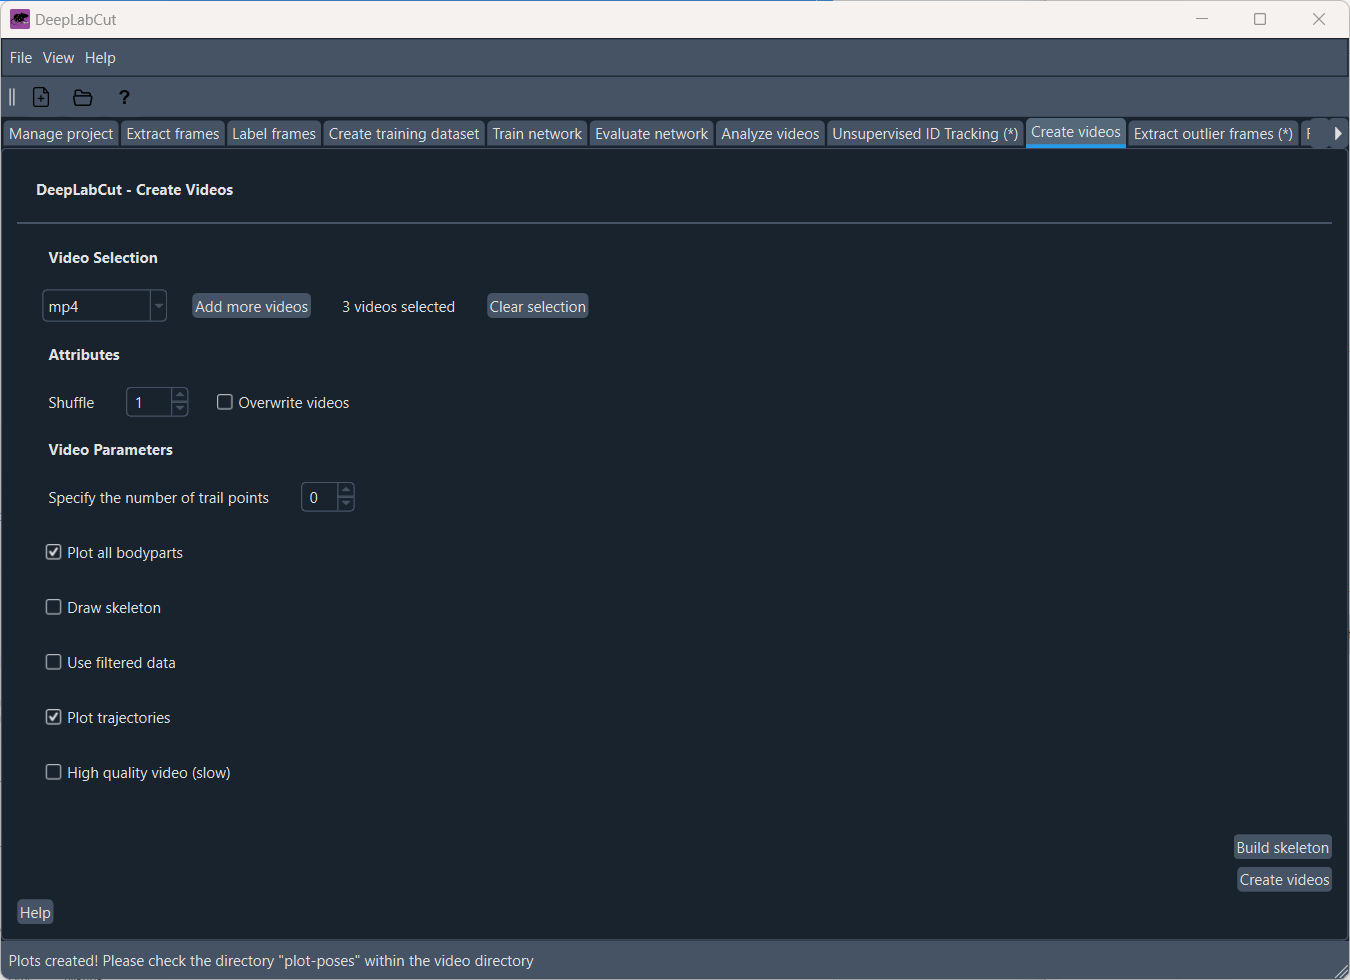
The ‘Create video’ tab.
The generated video will be save in the videos folder:
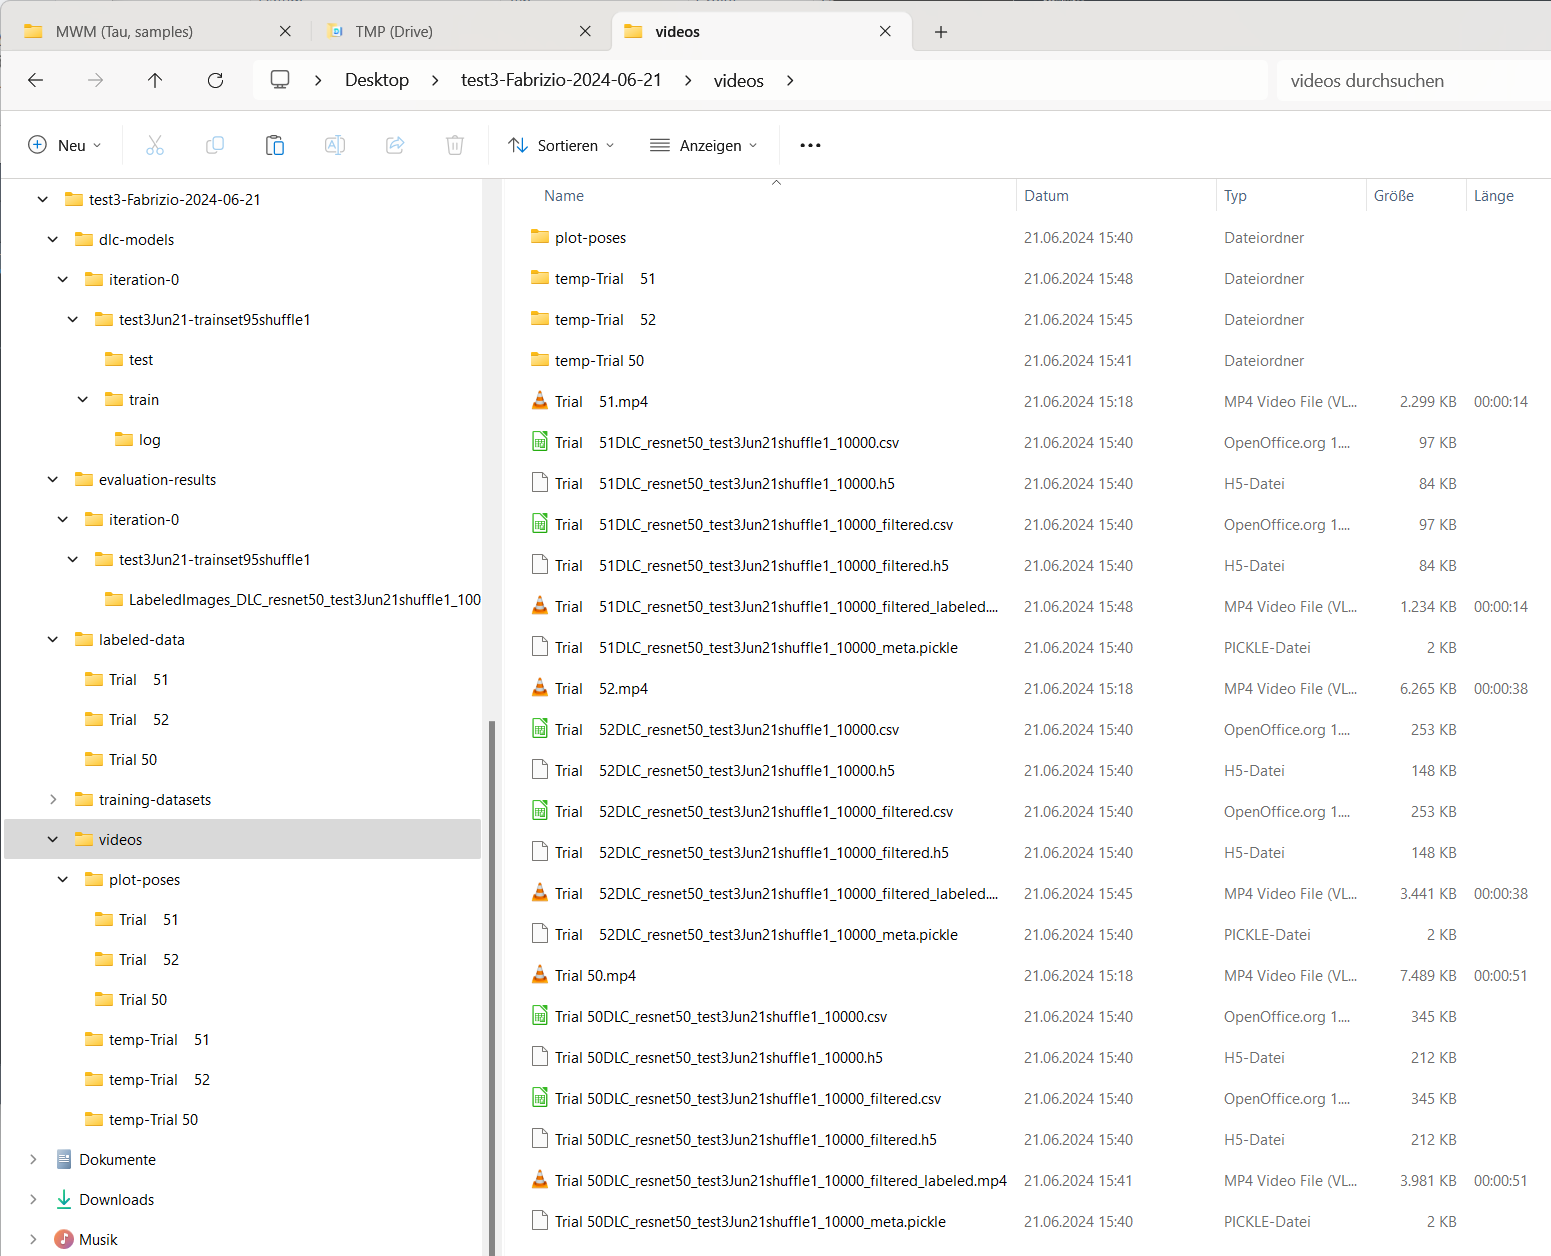
The videos folder containing the generated video with the tracking data overlaid on the original video.
For each analyzed video, a “plot-poses” will be created, which shows the tracking results for each video:
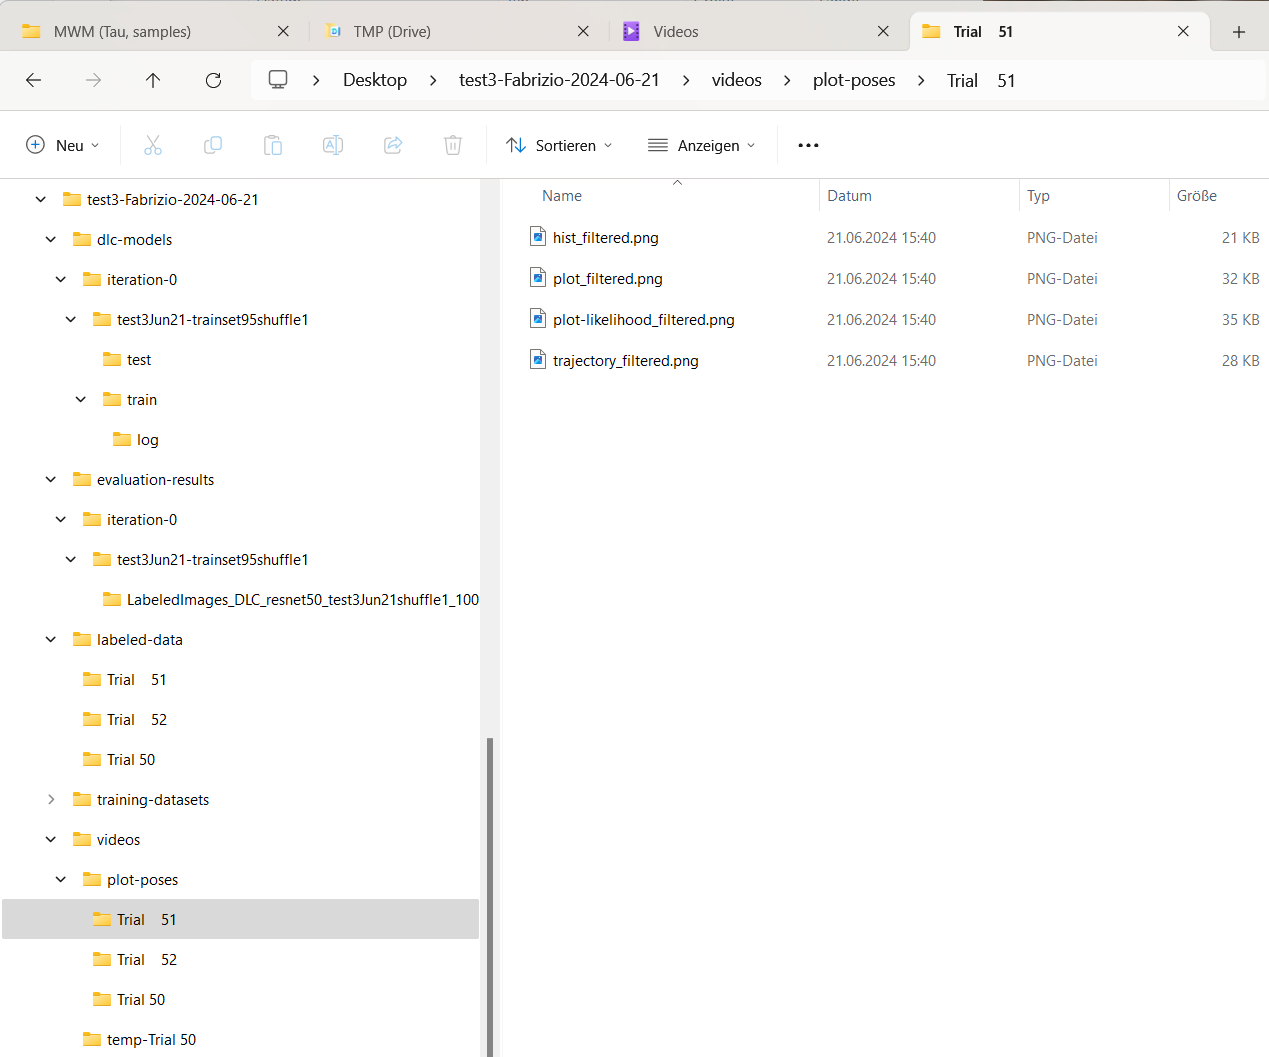
Content of the “plot-poses” folder containing the plotted tracking results for each video.
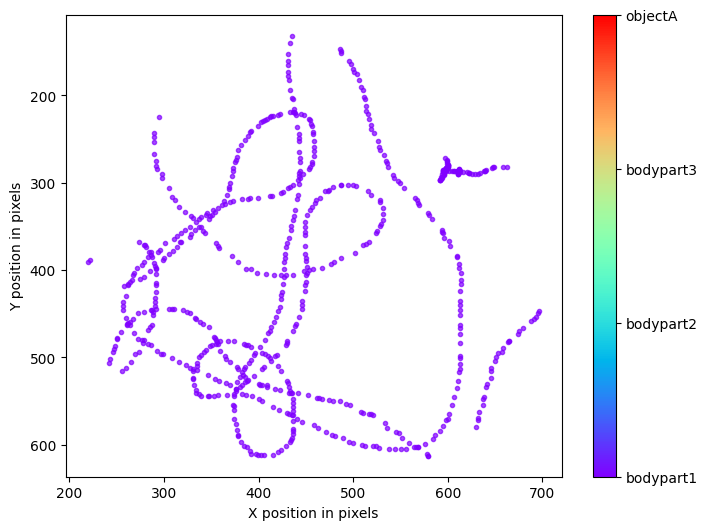
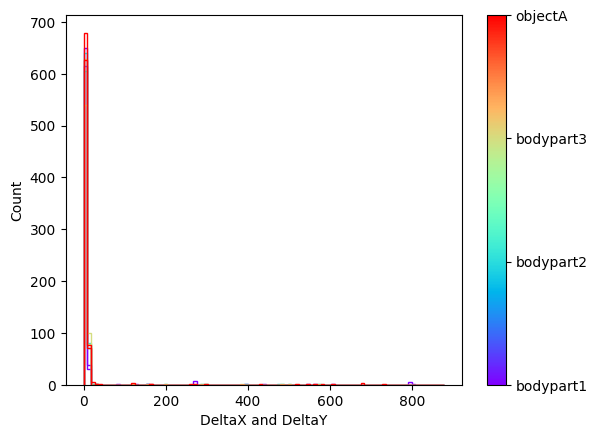
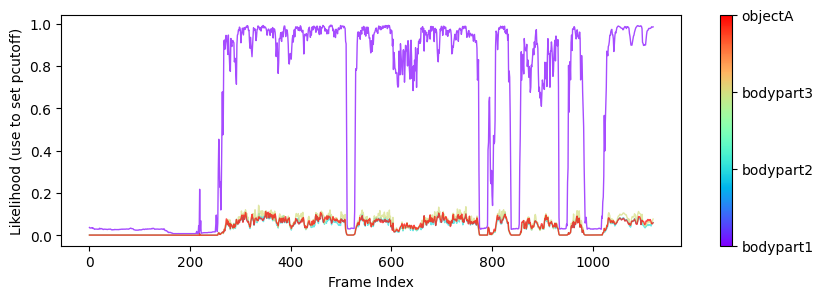
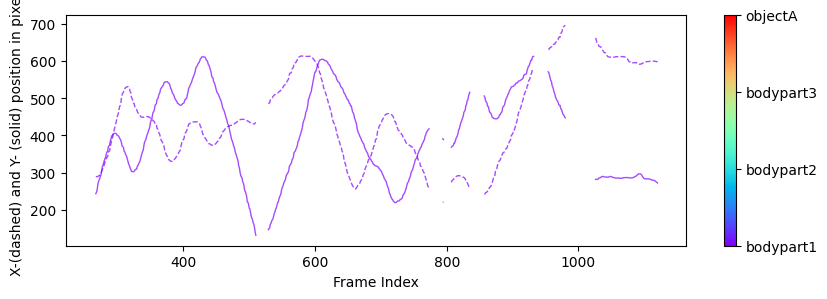
Plots from one example “plot-poses” folder, showing the trajectories of the tracked body parts, a histogram of the tracked body parts’ x- and y-coordinates, the likelihood of the predictions as a function of frame index, and the filtered x- and y-coordinates of the tracked body parts (showing which coordinates are below a certain threshold pcutoff and, thus, set to missing).
Refine the networkPermalink
In case the tracking results are not satisfactory, you can also refine the network by manually correcting the predicted labels and iteratively improve the feature detectors. To do so, we first need to extract outlier frames. In the ‘Extract outlier frames’ tab, you can select frames that are likely to be outliers based on different criteria.
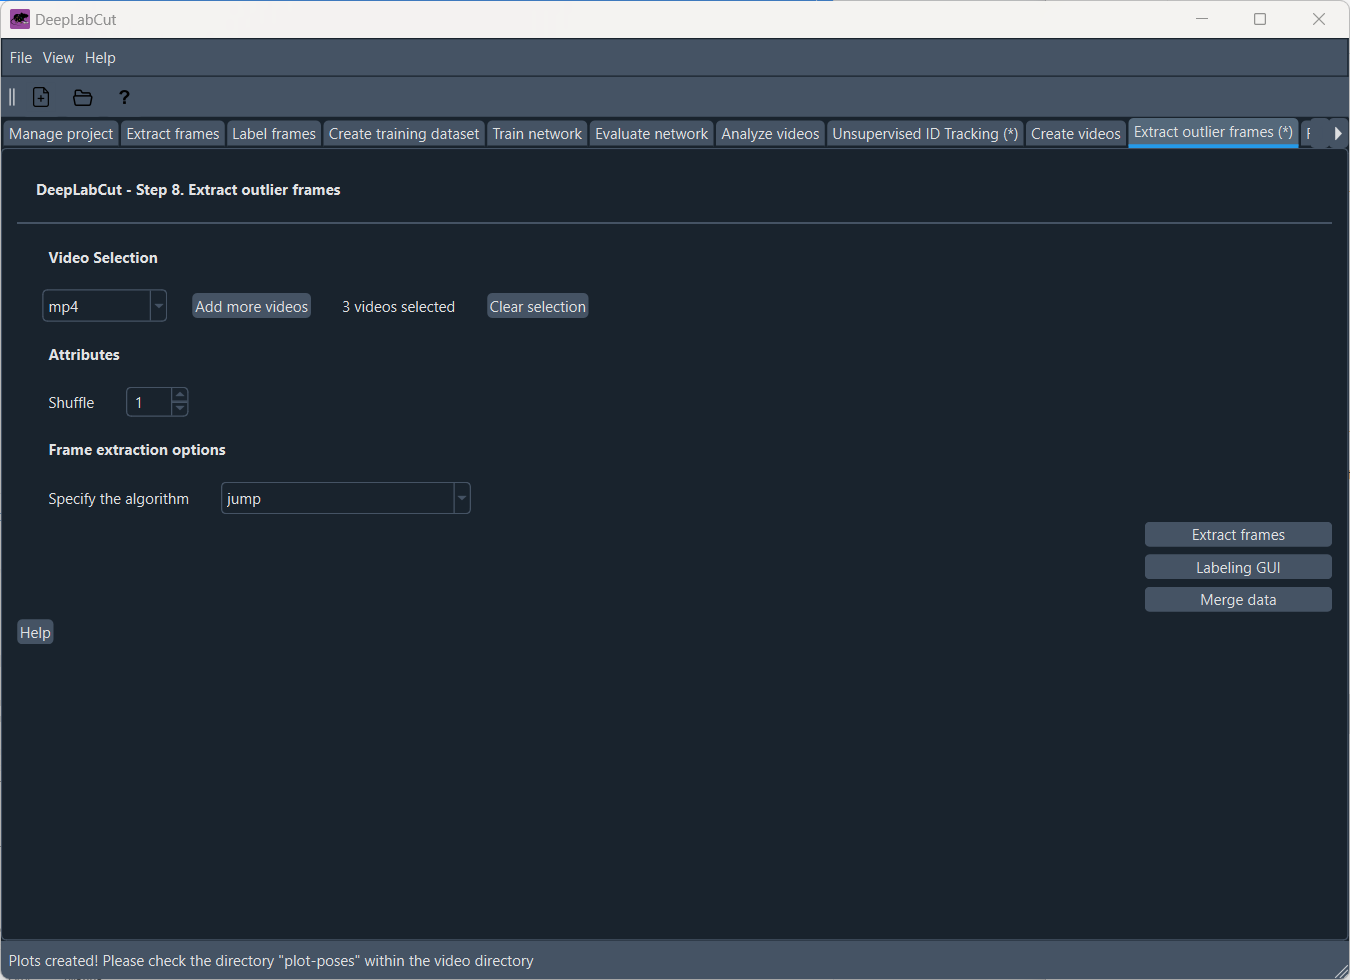
The ‘Extract outlier frames’ tab.
Several frame selection methods are available:
jump: select frames where a particular body part or all body parts jumped more than a certain amount of pixels from the last frameuncertain: select frames if the likelihood of a particular or all body parts lies belowpbound(note this could also be due to occlusions rather than errors);fitting: select frames if the predicted body part location deviates from a state-space model fit to the time series of individual body parts. Specifically, this method fits an Auto Regressive Integrated Moving Average (ARIMA) model to the time series for each body part. Thereby each body part detection with a likelihood smaller thanpboundis treated as missing data. Putative outlier frames are then identified as time points, where the average body part estimates are at least pixel away from the fits.manual: manually select outlier frames based on visual inspection from the user.
The labels for extracted putative outlier frames can be refined by opening the GUI via the following command (executed within a Python script or an active IPython session):
deeplabcut.refine_labels(config_path)This will launch a GUI where the user can refine the labels. Use the Load Labels’` button to select one of the subdirectories, where the extracted outlier frames are stored. Every label will be identified by a unique color. For better chances to identify the low-confidence labels, specify the threshold of the likelihood. This changes the body parts with likelihood below this threshold to appear as circles and the ones above as solid disks while retaining the same color scheme. Next, to adjust the position of the label, hover the mouse over the labels to identify the specific body part, left click and drag it to a different location. To delete a specific label, middle click on the label (once a label is deleted, it cannot be retrieved).
The following four strategies can be used to refine the labels:
- Visible body part with accurate DeepLabCut prediction. These labels do not need any modifications.
- Visible body part but wrong DeepLabCut prediction. Move the label’s location to the actual position of the body part.
- Invisible, occluded body part. Remove the predicted label by DeepLabCut with a middle click. Every predicted label is shown, even when DeepLabCut is uncertain. This is necessary, so that the user can potentially move the predicted label. However, to help the user to remove all invisible body parts the low-likelihood predictions are shown as open circles (rather than disks).
- Invalid images: In the unlikely event that there are any invalid images, the user should remove such an image and their corresponding predictions, if any. Here, the GUI will prompt the user to remove an image identified as invalid.
After correcting the labels for all the frames in each of the subdirectories, you should merge the data set to create a new dataset. In this step the iteration parameter in the config.yaml file is automatically updated:
deeplabcut.merge_datasets(config_path)Once the dataset is merged, you can test if the merging process was successful by plotting all the labels:
deeplabcut.check_labels(config_path, visualizeindividuals=True/False)Next, with this expanded training set you can now create a novel training set and train the network as described in the steps above. The training dataset will be stored in the same place as before but under a different iteration # subdirectory, where the # is the new value of iteration variable stored in the project’s configuration file (this is automatically done).
Repeat this process until you are satisfied with the tracking results.
ExercisesPermalink
Group exercises:
- Apply the workflow described above (without the refinement step) to the test data set provided during this tutorial. Each group will get a different data set.
- Consider an appropriate number of body parts to track and adjust the configuration file accordingly.
- Think and discuss about strategies how to consider objects and potential physical boundaries in your behavioral experiment. How can you include these in your DeepLabCut project?
- Consider an appropriate number of iterations for training the network and adjust all settings accordingly. Hint: In all installations, we use the PyTorch backend.
- Examine the tracking results and discuss the quality of the tracking. Compare the tracking results with the original videos and the outputs from the “Evaluate network” step. Discuss the tracking results and answer the question “How well does DeepLabCut track the animal behavior?” and “What are the limitations?
- Examine the output csv files and discuss how you could use this data for further analysis.
Plenary discussion:
- Compare your results with the results of the other groups.
- Discuss potential sources of error in the tracking results and how you could address them, regarding both the quality of the training movies and the steps in the DeepLabCut workflow.
- Discuss your previously discussed strategies for considering objects and physical boundaries in your behavioral experiment.
- Discuss your ideas for further analysis of the tracking data and how you could use the tracking data to answer specific research questions.
- Discuss the advantages and disadvantages of using DeepLabCut for tracking animal behavior and compare to other tracking methods you may know.
- In case you have no GPU available, discuss how you could still use DeepLabCut for tracking animal behavior.
ConclusionPermalink
DeepLabCut’s GUI is the perfect tool for getting started with markerless pose estimation and tracking animal behavior. The GUI provides an easy-to-use interface for creating a project, labeling frames, training the network, and analyzing the tracking results. For more advanced users, DeepLabCut also offers a command-line interface and a Python API, which provide more flexibility and customization options.
Further readingsPermalink
- DeepLabCut websiteꜛ
- DeepLabCut documentationꜛ
- DeepLabCut User Guide (for single animal projects)ꜛ
- Github repository of DeepLabCutꜛ
- Mathis, A., Mamidanna, P., Cury, K.M. et al., DeepLabCut: markerless pose estimation of user-defined body parts with deep learning, Nat Neurosci 21, 1281–1289 (2018). doi: 10.1038/s41593-018-0209-yꜛ
- Nath, T., Mathis, A., Chen, A.C. et al., Using DeepLabCut for 3D markerless pose estimation across species and behaviors, Nat Protoc 14, 2152–2176 (2019). doi: 10.1038/s41596-019-0176-0ꜛ
- Lauer, J., Zhou, M., Ye, S. et al., Multi-animal pose estimation, identification and tracking with DeepLabCut, Nat Methods 19, 496–504 (2022). doi: 10.1038/s41592-022-01443-0ꜛ